文字转绘图 [1]
基础函数
{\p1}!_G.decode.create_font(line.styleref.fontname, line.styleref.bold, line.styleref.italic, line.styleref.underline, line.styleref.strikeout, line.styleref.fontsize).text_to_shape(line.text_stripped)!
bold italic underline为Boolean值,如果手动填写,则可以写true / false.
因为输入的文字为line.text_stripped,这个基础函数是直接对整句起作用的。
优化生成结果
可以用一个code行,对生成的绘图代码去掉一些不必要的元素,并取整。
去掉c
绘图代码中的c可以被去掉。用code line行写一个text。
text = _G.decode.create_font(line.styleref.fontname, line.styleref.bold, line.styleref.italic, line.styleref.underline, line.styleref.strikeout, line.styleref.fontsize).text_to_shape(line.text_stripped) text=string.gsub(text," c","")
gsub的使用可以参考Aegisub 特效随记:音节计数器ci
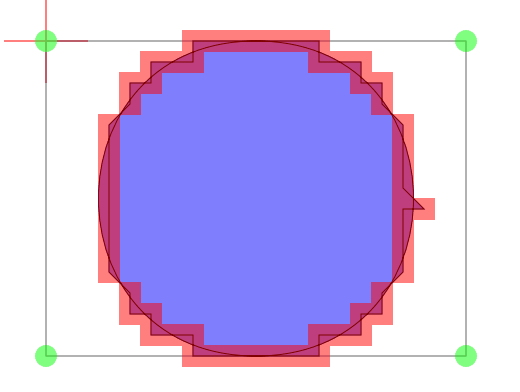
位数精简
接下来可以对绘图代码的位数进行优化。这里用到的是_G.Yutils.shape.filter函数。(关于此函数,请看第四节)
text = _G.decode.create_font(line.styleref.fontname, line.styleref.bold, line.styleref.italic, line.styleref.underline, line.styleref.strikeout, line.styleref.fontsize).text_to_shape(line.text_stripped)
text=string.gsub(text," c","")
text=_G.Yutils.shape.filter(text, function(x,y) return math.round(x),math.round(y) end)
对音节操作
如果要逐个生成音节的绘图代码,那么可以讲code行改为code syl,并将代码中的传入值改为syl.text_stripped
Comment: 0,0:00:00.00,0:00:00.00,Default,,0,0,0,code syl,text = _G.decode.create_font(line.styleref.fontname, line.styleref.bold, line.styleref.italic, line.styleref.underline, line.styleref.strikeout, line.styleref.fontsize).text_to_shape(syl.text_stripped) text=string.gsub(text," c","") text=_G.Yutils.shape.filter(text, function(x,y) return math.round(x),math.round(y) end)
Comment: 0,0:00:00.00,0:00:00.00,Default,,0,0,0,template,{\p1\pos($left,$top)\an7}!text!
定位
因为绘图代码的左上角被定在了(0,0),所以要用\an7对齐,且字符定位应在\pos($left,$top)
创建函数
为了更方便地使用,不刻意区分Syl和line,可以为上文中的text创建一个函数。
Comment: 0,0:00:00.00,0:00:05.00,Default,,0,0,0,code line,function shape() text = _G.decode.create_font(line.styleref.fontname, line.styleref.bold, line.styleref.italic, line.styleref.underline, line.styleref.strikeout, line.styleref.fontsize).text_to_shape(syl.text_stripped) text=string.gsub(text," c","") text=_G.Yutils.shape.filter(text, function(x,y) return math.round(x),math.round(y) end) return text end
Comment: 0,0:00:00.00,0:00:05.00,Default,,0,0,0,template line,{\p1\pos($left,$top)\an7}!shape()!
边框转绘图 [2]
在前文函数的基础上,引入_G.Yutils.shape.flatten()用直线来接近曲线;以及 _G.Yutils.shape.to_outline(),用于把图形转换为边框。
为什么要先化曲为直,再转换成轮廓呢?
因为图形转边框函数所处理的形状,只能有线条和点的移动。
shape have to contain only “moves” and “lines”
曲线转直线
_G.Yutils.shape.flatten()
这个函数可以把贝塞尔曲线变成直线。效果如下
function shape()
    text=_G.Yutils.shape.flatten("m 10 0 b 20 0 20 15 10 15 b 0 15 0 0 10 0 ")
    text=_G.Yutils.shape.filter(text, function(x,y) return math.round(x),math.round(y) end)
    return text
end
>
m 10 0 l 10 0 10 0 10 0 11 0 11 0 11 0 11 0 12 0 12 0 12 0 12 0 12 0 13 0 13 0 13 0 13 1 13 1 13 1 14 1 14 1 14 1 14 1 14 1 14 1 15 1 15 1 15 2 15 2 15 2 15 2 15 2 16 2 16 2 16 2 16 3 16 3 16 3 16 3 16 3 16 3 16 3 17 4 17 4 17 4 17 4 17 4 17 4 17 5 17 5 17 5 17 5 17 5 17 5 17 6 17 6 17 6 17 6 17 6 17 6 17 7 17 7 17 7 17 7 17 7 18 8 17 8 17 8 17 8 17 8 17 8 17 9 17 9 17 9 17 9 17 9 17 9 17 10 17 10 17 10 17 10 17 10 17 10 17 11 17 11 17 11 17 11 17 11 17 11 16 12 16 12 16 12 16 12 16 12 16 12 16 12 16 13 16 13 16 13 15 13 15 13 15 13 15 13 15 13 15 14 15 14 14 14 14 14 14 14 14 14 14 14 14 14 13 14 13 14 13 14 13 15 13 15 13 15 12 15 12 15 12 15 12 15 12 15 11 15 11 15 11 15 11 15 10 15 10 15 10 15 l 10 15 10 15 10 15 9 15 9 15 9 15 9 15 8 15 8 15 8 15 8 15 8 15 7 15 7 15 7 15 7 14 7 14 7 14 6 14 6 14 6 14 6 14 6 14 6 14 5 14 5 14 5 13 5 13 5 13 5 13 5 13 4 13 4 13 4 13 4 12 4 12 4 12 4 12 4 12 4 12 4 12 3 11 3 11 3 11 3 11 3 11 3 11 3 10 3 10 3 10 3 10 3 10 3 10 3 9 3 9 3 9 3 9 3 9 3 9 3 8 3 8 3 8 3 8 3 8 3 8 3 7 3 7 3 7 3 7 3 7 3 6 3 6 3 6 3 6 3 6 3 6 3 5 3 5 3 5 3 5 3 5 3 5 3 4 3 4 3 4 3 4 3 4 3 4 4 3 4 3 4 3 4 3 4 3 4 3 4 3 4 2 4 2 4 2 5 2 5 2 5 2 5 2 5 2 5 1 5 1 6 1 6 1 6 1 6 1 6 1 6 1 7 1 7 1 7 1 7 0 7 0 7 0 8 0 8 0 8 0 8 0 8 0 9 0 9 0 9 0 9 0 10 0 10 0 10 0
绘图转边框
_G.Yutils.shape.to_outline(text,1)
这个函数可以把图形变成边框。
function shape()
    text=_G.Yutils.shape.to_outline("m 10 0 l 10 0 l 10 0 l 10 0 l 11 0 l 11 0 l 11 0 l 11 0 l 12 0 l 12 0 l 12 0 l 12 0 l 12 0 l 13 0 l 13 0 l 13 0 l 13 1 l 13 1 l 13 1 l 14 1 l 14 1 l 14 1 l 14 1 l 14 1 l 14 1 l 15 1 l 15 1 l 15 2 l 15 2 l 15 2 l 15 2 l 15 2 l 16 2 l 16 2 l 16 2 l 16 3 l 16 3 l 16 3 l 16 3 l 16 3 l 16 3 l 16 3 l 17 4 l 17 4 l 17 4 l 17 4 l 17 4 l 17 4 l 17 5 l 17 5 l 17 5 l 17 5 l 17 5 l 17 5 l 17 6 l 17 6 l 17 6 l 17 6 l 17 6 l 17 6 l 17 7 l 17 7 l 17 7 l 17 7 l 17 7 l 18 8 l 17 8 l 17 8 l 17 8 l 17 8 l 17 8 l 17 9 l 17 9 l 17 9 l 17 9 l 17 9 l 17 9 l 17 10 l 17 10 l 17 10 l 17 10 l 17 10 l 17 10 l 17 11 l 17 11 l 17 11 l 17 11 l 17 11 l 17 11 l 16 12 l 16 12 l 16 12 l 16 12 l 16 12 l 16 12 l 16 12 l 16 13 l 16 13 l 16 13 l 15 13 l 15 13 l 15 13 l 15 13 l 15 13 l 15 14 l 15 14 l 14 14 l 14 14 l 14 14 l 14 14 l 14 14 l 14 14 l 13 14 l 13 14 l 13 14 l 13 15 l 13 15 l 13 15 l 12 15 l 12 15 l 12 15 l 12 15 l 12 15 l 11 15 l 11 15 l 11 15 l 11 15 l 10 15 l 10 15 l 10 15 l 10 15 l 10 15 l 10 15 l 9 15 l 9 15 l 9 15 l 9 15 l 8 15 l 8 15 l 8 15 l 8 15 l 8 15 l 7 15 l 7 15 l 7 15 l 7 14 l 7 14 l 7 14 l 6 14 l 6 14 l 6 14 l 6 14 l 6 14 l 6 14 l 5 14 l 5 14 l 5 13 l 5 13 l 5 13 l 5 13 l 5 13 l 4 13 l 4 13 l 4 13 l 4 12 l 4 12 l 4 12 l 4 12 l 4 12 l 4 12 l 4 12 l 3 11 l 3 11 l 3 11 l 3 11 l 3 11 l 3 11 l 3 10 l 3 10 l 3 10 l 3 10 l 3 10 l 3 10 l 3 9 l 3 9 l 3 9 l 3 9 l 3 9 l 3 9 l 3 8 l 3 8 l 3 8 l 3 8 l 3 8 l 3 8 l 3 7 l 3 7 l 3 7 l 3 7 l 3 7 l 3 6 l 3 6 l 3 6 l 3 6 l 3 6 l 3 6 l 3 5 l 3 5 l 3 5 l 3 5 l 3 5 l 3 5 l 3 4 l 3 4 l 3 4 l 3 4 l 3 4 l 3 4 l 4 3 l 4 3 l 4 3 l 4 3 l 4 3 l 4 3 l 4 3 l 4 2 l 4 2 l 4 2 l 5 2 l 5 2 l 5 2 l 5 2 l 5 2 l 5 1 l 5 1 l 6 1 l 6 1 l 6 1 l 6 1 l 6 1 l 6 1 l 7 1 l 7 1 l 7 1 l 7 0 l 7 0 l 7 0 l 8 0 l 8 0 l 8 0 l 8 0 l 8 0 l 9 0 l 9 0 l 9 0 l 9 0 l 10 0 l 10 0 l 10 0",1)
    text=_G.Yutils.shape.filter(text, function(x,y) return math.round(x),math.round(y) end)
    return text
end
>
m 9 1 l 9 1 8 1 8 1 8 1 8 1 8 1 7 2 6 2 6 2 6 2 6 2 6 2 5 3 5 3 5 3 5 4 4 4 4 5 4 5 4 6 4 6 4 7 4 7 4 8 4 8 4 9 4 9 4 10 4 10 4 11 5 11 5 12 5 12 5 12 5 12 6 13 6 13 6 13 6 13 7 13 7 13 8 14 8 14 8 14 8 14 9 14 9 14 10 14 10 14 11 14 11 14 12 14 12 14 12 14 12 14 12 14 13 13 14 13 14 13 14 13 14 13 14 13 15 12 15 12 15 12 15 11 16 11 16 10 16 10 16 9 16 9 16 8 16 8 17 7 18 7 17 7 17 9 16 8 16 7 16 6 16 6 16 5 16 5 16 4 15 4 15 3 15 3 15 3 15 3 14 2 14 2 14 2 14 2 13 2 13 2 12 1 12 1 12 1 12 1 11 1 11 1 10 1 10 1 m 10 -1 l 10 -1 11 -1 11 -1 12 -1 12 -1 13 -1 13 -1 14 0 14 0 14 0 14 0 15 0 15 0 16 1 16 1 16 1 16 1 17 2 17 3 18 3 18 4 18 5 18 5 18 6 18 6 18 7 19 7 19 8 18 9 18 9 18 9 18 9 18 10 18 10 18 11 18 12 17 12 17 13 17 13 16 14 16 14 16 14 16 14 15 15 14 15 14 15 14 15 14 15 14 15 13 16 12 16 12 16 11 16 11 16 10 16 10 16 9 16 9 16 8 16 8 16 7 16 7 16 6 15 6 15 6 15 6 15 5 15 5 15 4 14 4 14 4 14 4 14 3 13 3 12 2 12 2 11 2 10 2 10 2 9 2 9 2 8 2 8 2 7 2 7 2 6 2 6 2 5 2 5 2 4 2 3 3 3 3 2 3 2 4 1 4 1 4 1 4 1 5 0 6 0 6 0 6 0 6 0 6 0 7 -1 8 -1 8 -1 9 -1 9 -1

此函数可以填写2-3个传入参数。
第一个参数为需要被转换的图形。
当填写三个参数时,则2、3分别为x方向的边框粗细和y方向的边框粗细。
当填写两个参数时,则2为整体的边框粗细。
移动图形[3]
_G.Yutils.shape.move(shape,x,y)可以用来移动图形。
三个传入参数为:图形代码,移动的x坐标,移动的y坐标。
例如
Comment: 0,0:00:00.00,0:00:05.00,Default,,0,0,0,code line,function shape() text = _G.decode.create_font(line.styleref.fontname, line.styleref.bold, line.styleref.italic, line.styleref.underline, line.styleref.strikeout, line.styleref.fontsize).text_to_shape(syl.text_stripped) text=string.gsub(text," c","") text=_G.Yutils.shape.filter(text, function(x,y) return math.round(x),math.round(y) end) return text end
Comment: 0,0:00:00.00,0:00:05.00,Default,,0,0,0,template char notext,{\p1\pos($left,$top)\an7\bord0\blur5\clip(!_G.Yutils.shape.move(shape(),$left,$top)!)}!shape()!
Comment: 0,0:00:00.00,0:00:05.00,Default,,0,0,0,karaoke,这是一条测试字幕
这里我们试图给从文字转化过来的图形加一个clip边框。原始的坐标点在(0,0),而我们试图移动的坐标点为($x,$y),所以直接写\clip(!_G.Yutils.shape.move(shape(),$left,$top)!)

G.Yutils.shape.filter函数[4]
基础用法
_G.Yutils.shape.filter(text,function)函数可以处理一段图形代码中的x, y有序数对。
使用此函数时,若code为syl类,则template也需要是syl类。其它无限制
其中,function代表一个处理数对的函数,传入值两个(xy坐标),传出值也需要是两个(默认顺序同样是xy坐标)。例如:
_G.Yutils.shape.filter(text,function(x,y) return x+1, y+2 end)
即:把传入的text图形代码中所有的图形代码的横坐标+1,纵坐标+2。
`_G.Yutils.shape.filter("m 10 0 b 20 0 20 15 10 15 b 0 15 0 0 10 0 ",function(x,y) return x+1, y+2 end)
>
"m 11 2 b 21 2 21 17 11 17 b 1 17 1 2 11 2"
旋转图形
此处主要用到的是角度弧度制的转换,和旋转后坐标的获得。
角度弧度转换
Aegisub中math函数用的都是弧度制。如果传入量为角度制,那么
frz=t/180*math.pi
坐标旋转
复数
设原坐标为$(x,y)$,在复平面中可表示为$z=a+bi$.复平面中旋转只需乘以一个指代角的复数,这里旋转$\theta$角,那指代角的复数是$(\cos\theta,i\times\sin\theta)$
旋转后的复平面坐标为:$n=(a+bi)(\cos\theta,i\sin\theta)=a\cos\theta-b\sin\theta+i(b\cos\theta+a\sin\theta)$
即坐标$(a,b)$旋转$\theta$角后的新坐标为$$(a\cos\theta-b\sin\theta,b\cos\theta+a\sin\theta)$$
[5]
三角变换
首先点P一开始的坐标$(x,y)$也可以表示为$(r\cos{d},r\sin{d})$
那么旋转后的坐标就是$(r\cos(\alpha+d),r\sin(\alpha+d))$
计算一下$\cos(\alpha+d)$和$\sin(\alpha+d)$.
前者等于$\cos\alpha\times\cos{d}-\sin\alpha\times\sin{d}$,后者等于$\sin\alpha\times\cos{d}+\cos\alpha\times\sin{d}$
所以说一开始的坐标是$(r\cos{d},r\sin{d})$
而旋转后的坐标是$(r(\cos\alpha\times\cos{d}-\sin\alpha\times\sin{d}),r(\sin\alpha\times\cos{d}+\cos\alpha\times\sin{d}))$
整理一下是$(\cos\alpha\times{r}\times\cos{d}-\sin\alpha\times{r}\times\sin{d},\sin\alpha\times{r}\times\cos{d}+\cos\alpha\times{r}\times\sin{d})$
即$(x\cos\alpha-y\sin\alpha,x\sin\alpha+y\cos\alpha)$
[6]
示例代码
Comment: 0,0:00:00.00,0:00:00.00,Default,,0,0,0,code once,function rotate(x,y,t)  frz=-t/180*math.pi  a= x*(math.cos(frz))-y*(math.sin(frz)) b= y*(math.cos(frz))+x*(math.sin(frz))   return a,b  end
Comment: 0,0:00:00.00,0:00:00.00,Default,,0,0,0,code line,function shape(angle) text = _G.decode.create_font(line.styleref.fontname, line.styleref.bold, line.styleref.italic, line.styleref.underline, line.styleref.strikeout, line.styleref.fontsize).text_to_shape(syl.text_stripped) text=string.gsub(text," c","")  text=_G.Yutils.shape.filter(text,function(x,y) return rotate(x,y,angle) end)  text=_G.Yutils.shape.filter(text, function(x,y) return math.round(x),math.round(y) end) return text end
Comment: 0,0:00:00.00,0:00:00.00,Default,,0,0,0,template char notext,{\p1\pos($left,$top)\an7}!shape(60)!
框柱所有定位点的函数
_G.Yutils.shape.bounding(text)
传入数据为一个字符串形式的绘图内容;这个函数会返回4个值(两对x,y坐标),来框住所有绘图命令点。
写法:
-- code syl noblank
a,b,c,d=_G.Yutils.shape.bounding(text)
-- template syl noblank notext
!a! !b! !c! !d!
Yutils 渐变
Yutils库提供两种不同的渐变,分别是_G.interpolate_color和_G.Yutils.ass.interpolate_coloralpha。前者可以生成两个颜色之间的渐变,而后者可以生成多个自定义颜色之间的渐变。关于这两个的使用,记录在颜色与渐变专题中。
绘图转换像素点
_G.Yutils.shape.to_pixels(shape)
此函数的传入只有一个,即表示图形的字符串。
传出值为表,此表有1-n个小表,每个小表中含有三个值:x,y,alpha,分别表示像素点的坐标和透明度。
因此应当进行如下调用。
lua中用
#表名表示表的项数;故#pixels#表示所有的像素数量。
Comment: 0,0:00:00.00,0:00:05.00,Default,,0,0,0,code line,pixels = _G.Yutils.shape.to_pixels("m 33 -2 b 72 -2 72 48 33 48 b -6 48 -6 -2 33 -2 ")
Comment: 0,0:00:00.00,0:00:05.00,Default,,0,0,0,template line notext,!maxloop(#pixels)!{\pos(!pixels[j].x!,!pixels[j].y!)\p1}m 0 0 l 1 0 1 1 0 1
Comment: 0,0:00:00.00,0:00:05.00,Default,,0,0,0,karaoke,test
和文字一起处理(这里做了转边框操作)
Comment: 0,0:00:00.00,0:00:05.00,Default,,0,0,0,code line,text = _G.decode.create_font(line.styleref.fontname, line.styleref.bold, line.styleref.italic, line.styleref.underline, line.styleref.strikeout, line.styleref.fontsize).text_to_shape(line.text_stripped) text=_G.Yutils.shape.flatten(text) text=_G.Yutils.shape.to_outline(text,1) text=_G.Yutils.shape.move(text,line.left,line.top) text=_G.Yutils.shape.filter(text, function(x,y) return math.round(x),math.round(y) end) text=_G.Yutils.shape.to_pixels(text)
Comment: 0,0:00:00.00,0:00:05.00,Default,,0,0,0,template line notext,!maxloop(#text)!{\p1\move(!text[j].x!,!text[j].y!,!text[j].x+math.random(-50,50)!,!text[j].y+math.random(-50,50)!,3500,5000)\fad(0,1000)}m 0 0 l 1 0 1 1 0 1
Comment: 0,0:00:00.00,0:00:05.00,Default,,0,0,0,karaoke,测试

文字裂痕效果
让一个小长方形旋转,然后和文字绘图叠加抵消。因为长条会超出文字,所以需要用文字图形clip来遮住文字以外的部分。[7]
Comment: 0,0:00:00.00,0:00:00.00,Default,,0,0,0,code,function angle(x,y,o)    if x==0 then        return math.round(y*math.cos(math.rad(90-o))),math.round(y*math.sin(math.rad(90-o)))    elseif x>=0 then        return math.round(math.sqrt(x^2+y^2)*math.cos(math.rad((math.deg(math.atan(y/x))-o)))),math.round(math.sqrt(x^2+y^2)*math.sin(math.rad((math.deg(math.atan(y/x))-o))))    else        return math.round(math.sqrt(x^2+y^2)*math.cos(math.rad((math.deg(math.atan(y/math.abs(x)))-o)))),math.round(math.sqrt(x^2+y^2)*math.sin(math.rad((math.deg(math.atan(y/math.abs(x)))-o))))    end end
Comment: 0,0:00:00.00,0:00:00.00,Default,,0,0,0,code,xxx="m -2 -70 l 0 -70 l 0 70 l -2 70 l -2 -70" xx="m -2 -70 l -2 70 l 0 70 l 0 -70 l -2 -70"
Comment: 0,0:00:00.00,0:00:05.00,Default,,0,0,0,code syl noblank,a=math.random(180) b=math.random(180) c=math.random(180) d=math.random(180) e=math.random(180) f=math.random(180) g=math.random(180) h=math.random(180) i=math.random(180)
Comment: 0,0:00:00.00,0:00:05.00,Default,,0,0,0,code syl noblank,shape = _G.decode.create_font(line.styleref.fontname, line.styleref.bold, line.styleref.italic, line.styleref.underline, line.styleref.strikeout, line.styleref.fontsize).text_to_shape(syl.text_stripped) shape = string.gsub(shape, "c" ,"") shape=_G.Yutils.shape.filter(shape, function(x,y) return math.round(x),math.round(y) end)
Comment: 0,0:00:00.00,0:00:05.00,Default,,0,0,0,template syl noblank notext,{\p1\an7\pos($left,$top)\clip(!_G.Yutils.shape.move(shape,$left,$top)!)}!_G.Yutils.shape.move(_G.Yutils.shape.filter(xx, function(x,y) return angle(x,y,a) end), syl.width/2+math.random(-15,15),line.height/2+math.random(-15,15))!  !_G.Yutils.shape.move(_G.Yutils.shape.filter(xx, function(x,y) return angle(x,y,b) end), syl.width/2+math.random(-15,15),line.height/2+math.random(-15,15))!  !_G.Yutils.shape.move(_G.Yutils.shape.filter(xx, function(x,y) return angle(x,y,c) end), syl.width/2+math.random(-15,15),line.height/2+math.random(-15,15))! !_G.Yutils.shape.move(_G.Yutils.shape.filter(xx, function(x,y) return angle(x,y,d) end), syl.width/2+math.random(-15,15),line.height/2+math.random(-15,15))! !_G.Yutils.shape.filter(shape, function(x,y) return math.round(x),math.round(y) end)!
Comment: 0,0:00:00.00,0:00:05.00,Default,,0,0,0,karaoke,{\k125}测{\k125}试{\k125}文{\k125}字
此段代码的核心为:Shape_Function旋转图形的算法,以及反向连接两个图形。
此段代码摘录自9000方_恩流,笔者认为使用的旋转算法效率偏低。其他算法可以参考上方的旋转章节。
9000方_恩流同时指出,可以使用\iclip的方案来生成文字遮罩。
文字扭曲
扭曲需要用到逐帧动画。[8]
这里笔者直接使用具体的帧->ms变化来填写retime和maxloop。
Comment: 0,0:00:00.00,0:00:00.00,Default,,0,0,0,code once,frm=1000/24
Comment: 0,0:00:00.00,0:00:00.00,Default,,0,0,0,code syl noblank,shape = _G.decode.create_font(line.styleref.fontname, line.styleref.bold, line.styleref.italic, line.styleref.underline, line.styleref.strikeout, line.styleref.fontsize).text_to_shape(syl.text_stripped) shape=_G.Yutils.shape.filter(shape, function(x,y) return math.round(x),math.round(y) end) shape=string.gsub(shape," c","")
Comment: 0,0:00:00.00,0:00:00.00,Default,,0,0,0,template syl noblank notext,!maxloop($ldur/frm)!!retime("preline",frm*(j-1),frm*j)!{\an7\p1\pos($left,$top)}!_G.Yutils.shape.filter(shape, function(x,y) return x+2*math.sin(y+j),y end)!
Comment: 0,0:00:00.00,0:00:05.00,Default,,0,0,0,karaoke,{\k125}测{\k125}试{\k125}字

可以给形变值乘类似(1-j/maxj),来使形变量随时间逐渐变小。
给图形添加更多命令点
用_G.Yutils.shape.split(shape,max_length)函数可以给图形添加更多命令点,提供给filter函数计算,能让变形看起来不那么畸形。[9]
第一个参数为图形代码,第二个参数为分割线段的最大值。
该函数只能将直线分割成多个线段;对于一个包含曲线和直线的图形,只有直线部分会被处理。
Comment: 0,0:00:00.00,0:00:00.00,Default,,0,0,0,code line,shape="m 0 0 l 58 1 l 57 12 l 0 0 " shape=_G.Yutils.shape.split(shape,5) shape=_G.Yutils.shape.filter(shape, function(x,y) return math.round(x),math.round(y) end)
Comment: 0,0:00:00.00,0:00:00.00,Default,,0,0,0,template line notext,{\p1}!shape!
Comment: 0,0:00:00.00,0:00:05.00,Default,,0,0,0,karaoke,aaaa
Dialogue: 0,0:00:00.00,0:00:05.00,Default,,0,0,0,fx,{\p1}m 0 0 l 3 0 8 0 13 0 18 0 23 0 28 0 33 1 38 1 43 1 48 1 53 1 58 1 l 58 2 57 7 57 12 l 54 11 49 10 44 9 39 8 34 7 29 6 24 5 20 4 15 3 10 2 5 1 0 0
拆字

闪电函数
参见Aegisub自动化第7.1节。
文字描边效果 [10]
文字转绘图
参考上方。
修正绘图代码
使用Yutils库生成的绘图代码并不标准,例如
m 1 2 l 3 4 5 6 7 8 b 1 2 3 4 5 6 7 8 9 10 11 12
上段图形代码中,直线l后有多组点。标准的Aegisub绘图代码要求每两个点之间用l连接。
一个贝塞尔曲线由三对点组成,b后应当有且只有三对坐标。Yutils生成的贝塞尔曲线会有3*n对坐标。
因此,上述图形代码,标准形式为
m 1 2 l 3 4 l 5 6 l 7 8 b 1 2 3 4 5 6 b 7 8 9 10 11 12
按照此要求,创建一个自定义函数,用于将绘图代码标准化。
function kShape.YutilStd(ass_shape)
    local ass_shape=ass_shape:gsub("[lb][^%a]+",
        function(step)
            if step:match("^[lb]")=="l" then
                step=step:gsub("[-.%d]+ [-.%d]+",
                    function(p)
                        return "l "..p
                    end
                )
                else step=step:gsub("[-.%d]+ [-.%d]+ [-.%d]+ [-.%d]+ [-.%d]+ [-.%d]+",
                    function(p)
                        return "b "..p
                    end
                )
            end
            return step:gsub("^[lb] ","")
        end
    )
    return ass_shape
end
粒子贝塞尔曲线[11]
请参考:贝塞尔曲线和粒子描边
封闭图形
Yutils转文字生成的图形是不封闭的,例如正方形是m 0 0 l 1 0 l 1 1 l 0 1而不是m 0 0 l 1 0 l 1 1 l 0 1 l 0 0,这时就需要一个额外的函数来封闭图形。
function close(ass_shape)
    local s={}
    for m in ass_shape:gmatch("m[^m]+") do
        local start_point=m:match(" [-.%d]+ [-.%d]+ ")
        local end_point=m:match(" [-.%d]+ [-.%d]+ $")
        if start_point==end_point then
            s[#s+1]=m
        else
            s[#s+1]=m.." l"..start_point
        end
    end
    return table.concat(s)
end
实际应用模板
Comment: 0,0:00:00.00,0:00:00.00,Default,,0,0,0,code once,function close(ass_shape)     local s={}      for m in ass_shape:gmatch("m[^m]+") do          local start_point=m:match(" [-.%d]+ [-.%d]+ ")          local end_point=m:match(" [-.%d]+ [-.%d]+ $")           if start_point==end_point then              s[#s+1]=m           else            s[#s+1]=m.." l"..start_point        end     end     return table.concat(s)   end
Comment: 0,0:00:00.00,0:00:00.00,Default,,0,0,0,code syl noblank,style=syl.style   text = _G.decode.create_font(style.fontname, style.bold, style.italic, style.underline, style.strikeout, style.fontsize).text_to_shape(syl.text_stripped) text=string.gsub(text," c","") text=_G.Yutils.shape.move(text,line.left+syl.left,line.top) text=kShape.YutilStd(text)  text=close(text)
Comment: 0,0:00:00.00,0:00:00.00,Default,,0,0,0,code syl noblank,function change_Yutilsdraw(ass_shape)      local ass_shape=ass_shape:gsub("[lb][^%a]+",        function(step)              if step:match("^[lb]")=="l" then                step=step:gsub("[-.%d]+ [-.%d]+",                       function(p)                         return "l "..p                      end                 )                   else step=step:gsub("[-.%d]+ [-.%d]+ [-.%d]+ [-.%d]+ [-.%d]+ [-.%d]+",                      function(p)                         return "b "..p                      end                 )               end             return step:gsub("^[lb] ","")           end     )       return ass_shape   end
Comment: 0,0:00:00.00,0:00:00.00,Default,temp func,0,0,0,code once,temp = {} function set_temp(ref,val) temp[12] = val return val end
Comment: 0,0:00:00.00,0:00:00.00,Default,Bezier(n;x;y;t),0,0,0,code once,function Bezier(n,x,y,t) p_x = 0 p_y = 0 for i = 1, n, 1 do p_y = p_y + y[i] * set_temp("bern",bernstein(i-1,n-1,t)) p_x = p_x + x[i] * temp.bern end return p_x, p_y end
Comment: 0,0:00:00.00,0:00:00.00,Default,bernstein,0,0,0,code,function bernstein(i,n,t) return (factk(n) / (factk(i)*factk(n-i))) * (t^i) * ((1-t)^(n-i)) end
Comment: 0,0:00:00.00,0:00:00.00,Default,factk,0,0,0,code,function factk(n) k = 1 if (n > 1) then for i = 2, n, 1 do k = k * i end end return k end
Comment: 0,0:00:00.00,0:00:00.00,Default,Vector Move Function,0,0,0,code once,function Vector_Move(s_time,e_time,afterimage_dur,x_blur,y_blur,accel,base_pos_x,base_pos_y,max_space,scale_x,scale_y,s,x_add)  if (j == 1) then t = 0 pos_x = {} pos_y = {} if (afterimage_dur < 0 ) then afterimage_dur = 0 end c_point_x = {} c_point_y = {} point = {} i = 1 s:gsub("(%S+)", function(w) point[i] = w i = i + 1 end) dur = e_time-s_time i = 1 m = 0 max_x = -10000 min_x = 10000 max_y = -10000 min_y = 10000 scale_x = scale_x / 100 scale_y = scale_y / 100 while i <= #point do c_point_x = {} c_point_y = {} if point[i] == "m" then s_point_x = point[i+1] s_point_y = point[i+2] i = i + 3 elseif point[i] == "b" then c_point_x[1] = s_point_x*scale_x c_point_y[1] = s_point_y*scale_y for k = 2, 4, 1 do c_point_x[k] = point[i+1+(k-2)*2]*scale_x c_point_y[k] = point[i+2+(k-2)*2]*scale_y end max_x = math.max(max_x,_G.unpack(c_point_x)) max_y = math.max(max_y,_G.unpack(c_point_y)) min_x = math.min(min_x,_G.unpack(c_point_x)) min_y = math.min(min_y,_G.unpack(c_point_y)) c_point_x[1] = s_point_x*scale_x+base_pos_x c_point_y[1] = s_point_y*scale_y+base_pos_y for k = 2, 4, 1 do c_point_x[k] = point[i+1+(k-2)*2]*scale_x+base_pos_x c_point_y[k] = point[i+2+(k-2)*2]*scale_y+base_pos_y end s_point_x = point[i+5] s_point_y = point[i+6] i = i + 7 elseif point[i] == "l" then c_point_x[1] = s_point_x*scale_x c_point_y[1] = s_point_y*scale_y c_point_x[2] = point[i+1]*scale_x c_point_y[2] = point[i+2]*scale_y max_x = math.max(max_x,_G.unpack(c_point_x)) max_y = math.max(max_y,_G.unpack(c_point_y)) min_x = math.min(min_x,_G.unpack(c_point_x)) min_y = math.min(min_y,_G.unpack(c_point_y)) c_point_x[1] = s_point_x*scale_x+base_pos_x c_point_y[1] = s_point_y*scale_y+base_pos_y c_point_x[2] = point[i+1]*scale_x+base_pos_x c_point_y[2] = point[i+2]*scale_y+base_pos_y s_point_x = point[i+1] s_point_y = point[i+2] i = i + 3 else _G.aegisub.debug.out("Unknown drawing command. You can use only \"m\" , \"b\" , \"l\"^^;") i = #point+1 end    c_t = 0 n = #c_point_x if n ~= 0 then  while c_t <= 1 do m = m + 1  pos_x[m], pos_y[m] = Bezier(n,c_point_x,c_point_y,c_t)   n_x, n_y = Bezier(n,c_point_x,c_point_y,c_t+0.1) dist = math.sqrt(math.abs(n_x-pos_x[m])^2+math.abs(n_y-pos_y[m])^2) c_t = c_t + max_space/dist*0.1 end end end maxloop(m) end retime("presyl",s_time+dur*(t^accel),s_time+dur*((t+1/m)^accel)+afterimage_dur) t = t + 1/m adjust_x = -(max_x - min_x) / 2 - min_x adjust_y = -(max_y - min_y) / 2 - min_y  return  string.format("\\move(%.2f,%.2f,%.2f,%.2f,%.1f,%.1f)",pos_x[j]+x_add,pos_y[j],pos_x[j]+x_blur+x_add,pos_y[j]+y_blur,afterimage_dur/2,afterimage_dur) end
Comment: 1,0:00:00.00,0:00:00.00,Default,,0,0,0,template syl notext noblank,{!Vector_Move(-300,syl.duration-300,1000,0,math.random(100,200),1,0,0,1,100,100,text,0)!\p1\bord0\an7\1c!_G.ass_color(_G.HSV_to_RGB(j/maxj*360,1,1))!}m 0 0 l 0 2 l 2 2 l 2 0
Comment: 0,0:00:00.00,0:00:00.00,Default,,0,0,0,template syl noblank,!retime("syl",-100,$ldur-$send+200+30*$si)!{\fad(500,500)\pos($x,$y)}
Comment: 0,0:00:00.00,0:00:05.00,Default,,0,0,0,karaoke,{\k63}这{\k63}是{\k63}一{\k63}句{\k63}测{\k63}试{\k63}字{\k63}幕
